Creating a Questionnaire
To create a questionnaire click the <Create New> button, this will load a page with a questionnaire editor. This editor is mostly just drag and drop. One major step has to be taken before creating the first question.
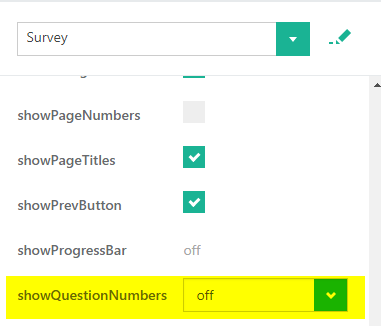
Please apply this step otherwise; some of the results may be displayed incorrectly.
- In the options box on the right scroll down to the ‘showQuestionNumbers’ option and turn it to off.
To create your first question select a question type from the Toolbox located on the left of the screen, then simply click to add it to the questionnaire.
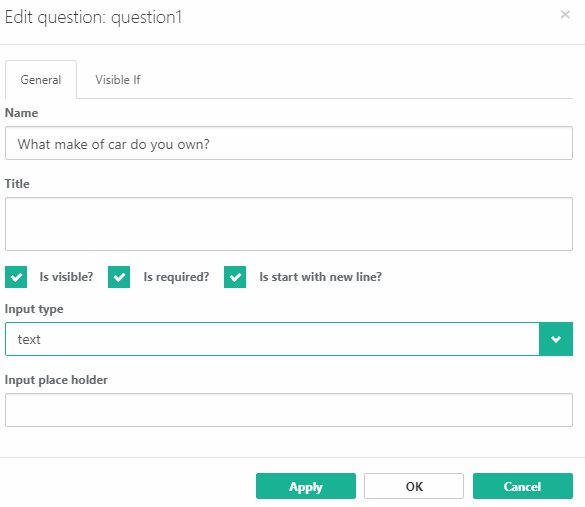
Click on the question and press the <Edit> button, this will open up the following dialog box.

Type your desired question into the ‘Name’ box. Note: Please leave the ‘Title’ box blank. If the user must answer the question then please tick the ’is required’ checkbox.
The input type will apply validation to the box and only allow the user to insert a certain type of answer such as text, dates or numbers. Once completed please press <Apply> then <OK>.
Radiogroup, Checkbox or Dropdown Question
To create a question with multiple options such as a Radiogroup or Dropdown. Click your desired option and initially follow the same steps as above. To set the options of your radio group click the ‘Choices’ tab in the question menu.
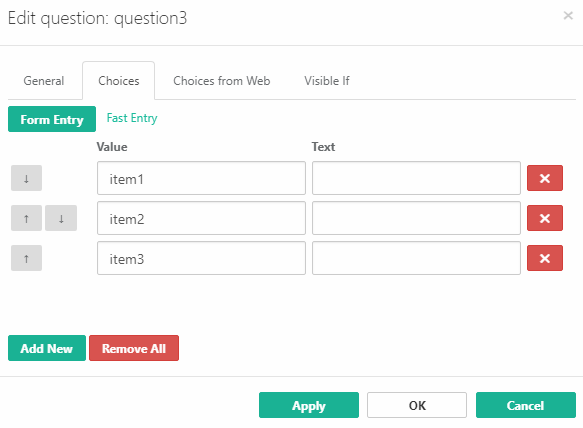
Please add your options into the ‘Value’ section and leave the ‘Text’ box blank as show below:
Now click <Apply> and <OK>.
If creating a question using a date field
- Use the Date picker question type from the toolbox.
To add a second page to the questionnaire
- Click the “+” symbol beside the page button to add more pages. Recommended if the questionnaire will contain a large amount of questions.
Creating a question with multiple options
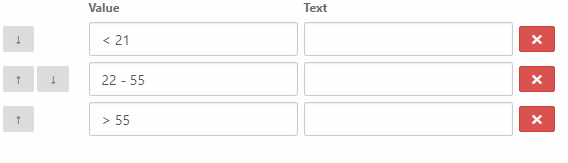
- Click the desired question type from the toolbox. There will now be an extra tab in the Edit question box called “Choices”.
- Please insert the different options into the “Value” box and not the “Text” box as shown.
Adding Logic to question so it will appear based on previous answer
- Create the first question
- Create question you wish to appear based on answer. In the edit dialog box navigate to the “Visible If” header.
Add the name of the previous question between {} braces as shown and make it equal to the option you wish to show your question when answered.
Supported Question Types
Currently some of the question types in the Toolbox are unsupported. Below is the list of the currently supported question types:
- Single Input
- Checkbox
- Radiogroup
- Dropdown
- Comment
- Rating
- Boolean
- Html
- Matrix(single choice)
- Matrix(multiple choice)
- Matrix(dynamic rows)
- Multiple Text
- Date picker
Auto-Populating Fields
We can auto-populate some fields based on data from IPS. The current fields that can be auto populated are:
- Case Name
- Case Code
- Name
- CKEY
- Claim
- Case Address
To auto populate a field you must select the ‘defaultValue’ box in the menu on the right and fill it with one of the following inputs. Then click Apply.
- LQCASE_CASENAME
- LQCASE_CASECODE
- LQCONTACT_NAME
- LQCONTACT_CKEY
- LQCONTACT_CLAIM
- LQCASE_ADDRESS

When the user opens the questionnaire, any fields with these values will be replaced with the relevant value from IPS.
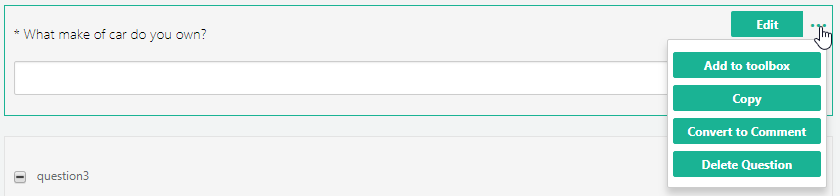
Deleting a Question
To delete a question simply highlight the selected question, click the 3 dots and choose <Delete Question>.
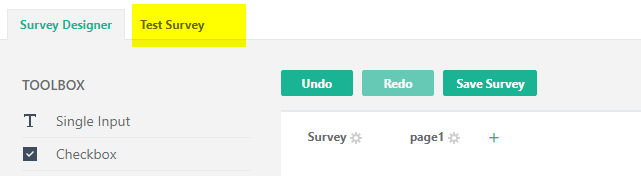
Viewing your Questionnaire
To see a preview of your questionnaire there is a ‘Test Survey’ box located just above the Toolbox, this will show you the questionnaire exactly as a user taking the questionnaire would see it.
Saving your Questionnaire
To save your questionnaire please insert a name into the box at the top of the page and click the <Save Survey> button. Once it has been successfully saved, it should appear in the ‘Questionnaire List’ on the admin Index page.

